
Is It English? Is It French? Does It Matter?
I'm continuing on writing about building some wooden layout squares for the shop. If you haven't been following up to this point you can catch up on the previous posts HERE.
I kind of like Twitter, aside from the stupid name, the group of woodworkers out there are a great bunch of guys. Awhile back when I was beginning work on these squares I spent a day in the shop "Tweeting" through my progress. I would take a picture with my phone and upload it with a "Tweet" I kept calling it an English Layout Square after the title Chris Schwarz and Patrick Leach had bestowed upon it. One of my followers "Tweeted" up, (you see what I mean about the name, I feel like I'm writing about Dr. Seuss) anyway, he said
"I still reckon these are French squares - they are hanging on the wall in Roubo plate 11. Whatever, I love yours, Derek :)",
I answered that I was going with what The Schwarz was calling it but I knew the "Roubo" square was more akin to a try square in design. then Jeremy sent me a link to this picture, posted for download on Popular Woodworking's website.
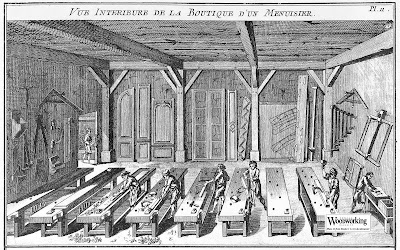 Can you see it. It's a little like a Where's Waldo puzzle. I'd studied this picture a lot, but I had never caught the square / level hanging on the wall on the right side of the picture before. Jeremy had gotten me, and I'm rather glad he did.
 So what is one to do when presented with that kind of information? You say "awesome idea" and you go with it. Thank you again Jeremy.
But before I could get that far I had a few things to finish up. I wanted to peg the half lap joints for some added stability and because I really though it would look great especially if I used some contrasting wood and I had just the stuff. A while back I picked up a bag of random exotic turning blanks from Woodcraft. I never use exotics at all, but they seemed perfect to turn into some tool handles. So the admission here is that I have no idea what wood this is. If you can figure it out from the pictures you're a better person than I, drop me a comment and let me know what you think it is.
 It planed beautifully and was kind of oily once you got deeper than the outer dried layer. After I got it squared up I ran it through the bandsaw to resaw it down to a pile of square dowels a little bigger than 1/4"X1/4" I cut several lengths at around 3/4", tapered them and pounded them through my doweling plate to make 1/4" round dowel.
 I laid out and drilled the holes, then placed the dowels with some hide glue.
 A little flush cut, a little sanding and I had that wow factor I was looking for.
 I squared it up at this point, but I'm not going to show that part because I think Chris Schwarz shows it best via a short video on his blog. HERE"S A LINK to that post and video.
Now I was ready to make the layout square more versatile by giving it the chance to act as a level as well. The first thing I had to do was go out and find a smallish plumb bob. A little time on eBay and I had what I was looking for.
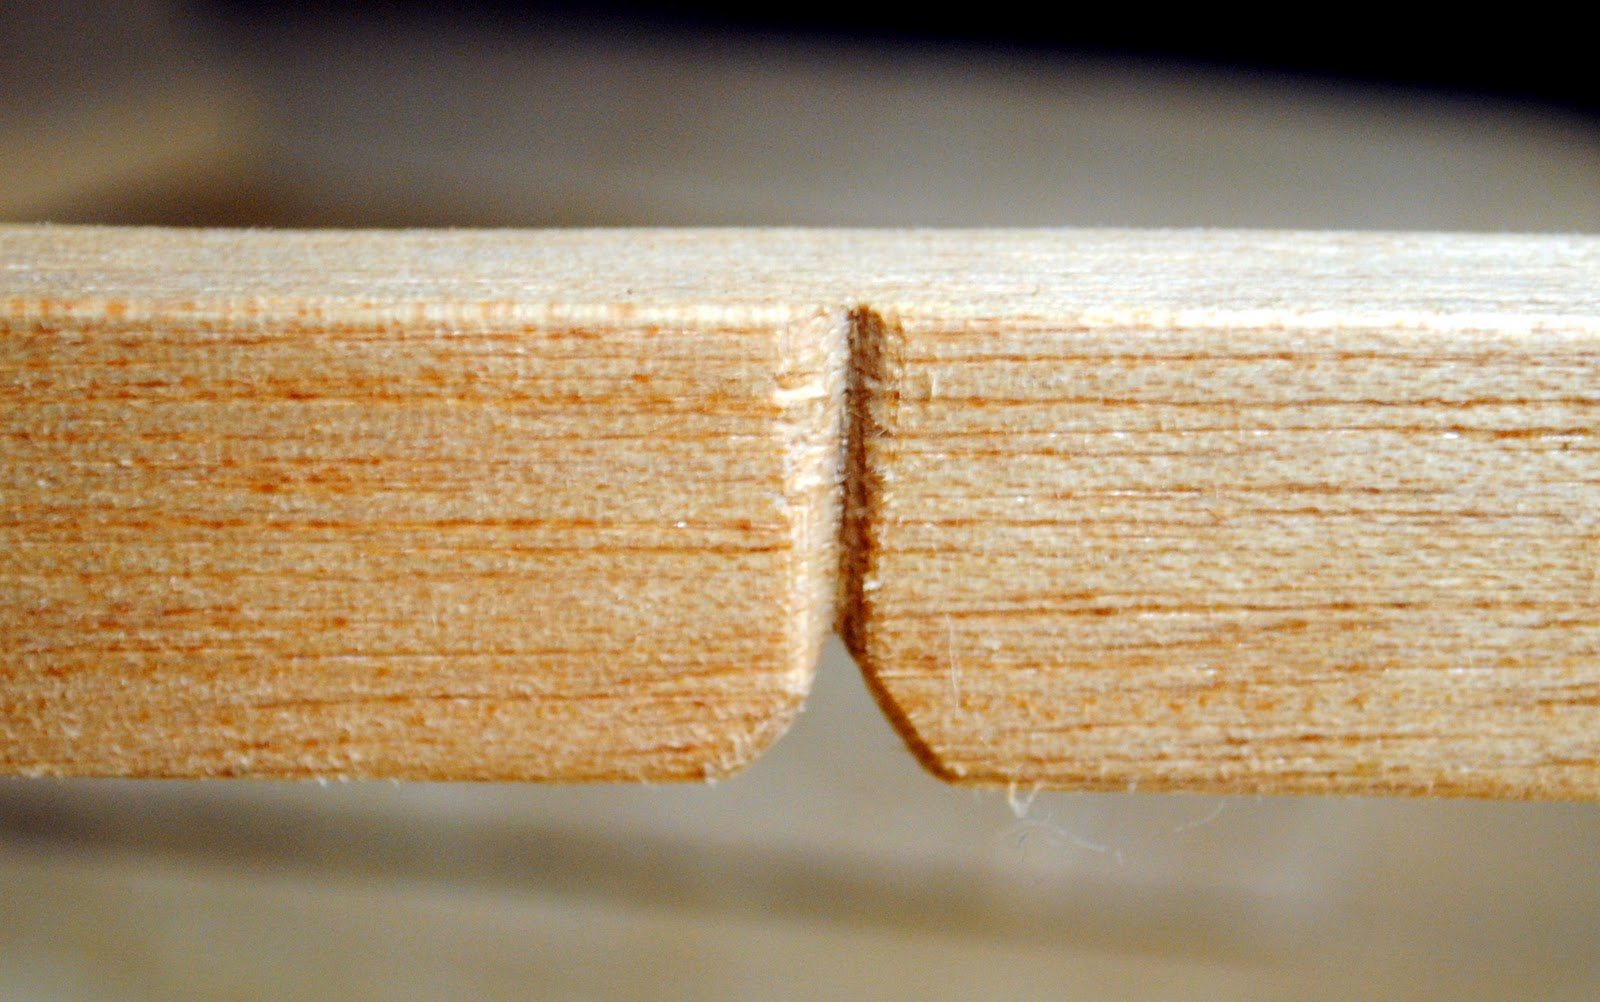
 I drilled a 3/8" hole, in hindsight a little larger than I really wanted to, but it's OK. I hit the hole with a little light touch of a countersink to ease the edges. I then took a coping saw blade without the coping saw, and used it to teardrop the hole a little.
 I left the teardrop very tight so that a know in the string would catch in the notch. This way I didn't have to worry too much about leaving the bob tied to the layout square when I just wanted to use it for layouts.
 Lately I have been having an excellent time reading Kari Hultman's blog, The Village Carpenter, as she's crafting a level. (If you haven't seen it you should because it's amazing work) Earlier this afternoon I had to smile as I thought of her work because now I had a new level too, albeit a different and cruder version. But in her post introducing the project I think we may have an answer to the question I pose in the title of this article. Is it English? Is it French? Nope, it's Egyptian. Read it HERE.
I laid my four foot construction level on the workbench and shimmed it until the bubble was plumb I then rested the arms of the square on the level, with the plumb bob attached. I waited a few seconds for the bob to stop moving and then held the string tight. I used a pencil to mark on the cross piece on either side of the string. Then I used a sharp chisel to cut a "V" marking plumb, then I also excavated a very shallow indent.
 I realize this small indent could give a narrowly false positive when marking level, but seriously the plumb bob is mostly a fun contrivance. I'm not giong to trade in any of my bubble levels for this any time soon, but if I'm in a pinch, I may find myself leveling out with this baby.
A coat of danish oil and she was looking beautiful, and you may think that was enough for me and sqaures, but you'd be mistaken. I had a couple more things I wanted to try.

I kind of like Twitter, aside from the stupid name, the group of woodworkers out there are a great bunch of guys. Awhile back when I was beginning work on these squares I spent a day in the shop "Tweeting" through my progress. I would take a picture with my phone and upload it with a "Tweet" I kept calling it an English Layout Square after the title Chris Schwarz and Patrick Leach had bestowed upon it. One of my followers "Tweeted" up, (you see what I mean about the name, I feel like I'm writing about Dr. Seuss) anyway, he said
"I still reckon these are French squares - they are hanging on the wall in Roubo plate 11. Whatever, I love yours, Derek :)",
I answered that I was going with what The Schwarz was calling it but I knew the "Roubo" square was more akin to a try square in design. then Jeremy sent me a link to this picture, posted for download on Popular Woodworking's website.

But before I could get that far I had a few things to finish up. I wanted to peg the half lap joints for some added stability and because I really though it would look great especially if I used some contrasting wood and I had just the stuff. A while back I picked up a bag of random exotic turning blanks from Woodcraft. I never use exotics at all, but they seemed perfect to turn into some tool handles. So the admission here is that I have no idea what wood this is. If you can figure it out from the pictures you're a better person than I, drop me a comment and let me know what you think it is.


Now I was ready to make the layout square more versatile by giving it the chance to act as a level as well. The first thing I had to do was go out and find a smallish plumb bob. A little time on eBay and I had what I was looking for.


I laid my four foot construction level on the workbench and shimmed it until the bubble was plumb I then rested the arms of the square on the level, with the plumb bob attached. I waited a few seconds for the bob to stop moving and then held the string tight. I used a pencil to mark on the cross piece on either side of the string. Then I used a sharp chisel to cut a "V" marking plumb, then I also excavated a very shallow indent.
A coat of danish oil and she was looking beautiful, and you may think that was enough for me and sqaures, but you'd be mistaken. I had a couple more things I wanted to try.

Cheers.
Oldwolf


I suppose I could be missing something, but it appears that the only accurate way to use yours or the one in the engraving from Roubo's book would be to plumb something at 45 degrees, such as making sure a stair stringer is exactly at 45 degrees. I would appreciate it if you could show it in use in a future post.
ReplyDeleteHey Simon,
ReplyDeleteSorry for any confusion in my explanation, A-Frame levels have been around for centuries and they can be very accurate in telling level from a graded surface. Infact A-frame levels were the tool used by the ancient Egyptians in the layout of the Great Pyramids at Giza.
Again there is not a whole lot of practical application in furniture making but in a larger project possibly. I would be happy to show some of how I understand to use it in my next posting.
Thanks for the question.
Glad to see the Concorde (Anglo-French) square with plum-bob capacity actualised. It looks really good.
ReplyDeleteCheers
Jeremy
Ahem, I disagree....
ReplyDeleteThese are just a quick 10 uses off the top of my head:
It will work like winding sticks to detect twist.
It can be used to check a miter.
It will mark a perpendicular line to cut square with a saw.
It will mark the middle of a board.
It can be used like a bevel gauge to duplicate an angle.
It can be used to make sure mortises are cut straight
It can be used as a sighting line for drilling perpendicular.
It can be used to set a stile perpendicular.
It can be used to set doors perpendicular.
It can be used as a sighting line to find equal height points.
This is the first multi-purpose precision tool. There is a saying that all you need to build anything from wood is a string and an axe. This is the first thing you build to expand that functionality and create more complex construction. The next ones that follows are fixed angle squares like try squares and miter gauges.
Holy crap David!! I guess I hadn't put just enough thought into that before I opened my mouth. :)
ReplyDeleteNow I have some really cool things to try out. They all make sense when you say them, but I admit I hadn't really thought past the "its a cool thing to add to a cool little project" factor. I've got some experimenting and exploring to do,
Thanks again David!
NOw I also know how to get that flat on the cross member. By the way, I'm pretty sure the wood you used was African Blackwood for the dowels and meranti for the rest.
ReplyDeleteAfrican Blackwood, Like I said I don't know exotics at all but I have heard of that so it must be somewhat common, enough so that it would end up in a turner's grab bag.
ReplyDeleteThe rest of the square is not Meranti though, it is Mahogany,
Thanks for reading and commenting.