
My Take On The Tool Rack
I decided to build a project for my new shop, I'm not in the shop yet, but I was too excited to hold back. I settled on the Tool Rack Chris Schwarz published as an "I Can Do That" project in Popular Woodworking a while back. Like every idea I steal borrow from someone else, I have to tweak things a little to make them feel like their my own. I call the process narcissism creativity.
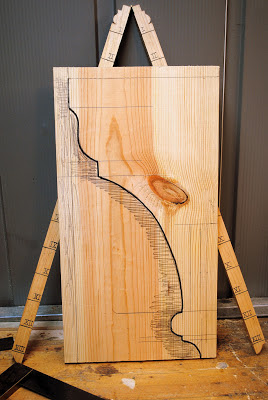
I had to change the look of the sides, I just wasn't happy with the elongated ogee on the original. I used a couple of sectors to lay out a federal period crown moulding profile and I was happy with the results. (You can read about the process HERE) After I was done I realized I could have worked the stock to exclude the big knot in the board. I started with including it because if there has to be a knot I want it contained within the piece, not riding the edge.
I like knots, they can bring a visual interest to the piece, I plan around them when I can but I don't shy away from them unless I'm carving. What I don't like is when a joint line or board edge bisects across a knot. Half a knot is not attractive.
To cut them together on the band saw I used some drywall screws to pin both sides together. Ahgast and horror at making these unsightly holes in a piece, especially where the bevels under the screw head mar the wood further. I know, but never fear, three of the four screw heads went into areas that would be waste. The prominent one up front is where I planned to drill a hole for a peg, The other two fell into areas to be removed for the joinery of the back and tool board. The only blemish left would be along the back edge on top. Building it for someone else and I would fill it. Since this is a shop piece, I'll be happy to leave it alone.

After sawing them out, I kept the sides screwed together while I cleaned up the saw lines by rasp and by scraper.

Then I drilled through mortises for the tool board and a space for the back board was sawn out.

Then I could separate the twins.

I pinched them back together with a couple clamps, (because I forgot this part) and sawed a couple through tenons to fit through the top shelf. Joining the top shelf with a dado and wedged through tenons.
.JPG)
I cut my dado into the top shelf using a stair saw and chisels. Then I used the sides to line up where to drill and chisel all the way through.
.JPG)
.JPG)
I did a dry fit assembly and surveyed my work. The sides were good but there was something missing. I thought about Peter Follansbee's tool chest, and not only the painting on the outside, but how he had used some scraps of carving demos for the shelf rails on the inside. (You can read about that HERE) I had already built my tool chest by the time I saw what he had done and I was sorry I hadn't thought of the same thing. I decided to not let another opportunity pass me by.

I laid out a quick pattern of interconnecting circles, thanks to George Walker I've come to know this as a Guilloche pattern. It's become one of my favorite carving themes. After carving out the circles I carved out a pattern of swirls and flowers to fill the rounds.
.JPG)
Pine does not like to be carved. It is much more challenging than oak and getting a crisp line can be difficult between the winter wood and the summer wood. The carvings turned out a little rough, but over all I'm ok with that. Over all they look good together, and again, this is for my shop.
.JPG)
I got the glue up in and after letting it set up I was able to balance the tool rack on the bench top to see how things might look eventually.
Now I was down to the pegs. but we'll save those for next time.
Ratione et Passionis
Oldwolf
I had to change the look of the sides, I just wasn't happy with the elongated ogee on the original. I used a couple of sectors to lay out a federal period crown moulding profile and I was happy with the results. (You can read about the process HERE) After I was done I realized I could have worked the stock to exclude the big knot in the board. I started with including it because if there has to be a knot I want it contained within the piece, not riding the edge.
I like knots, they can bring a visual interest to the piece, I plan around them when I can but I don't shy away from them unless I'm carving. What I don't like is when a joint line or board edge bisects across a knot. Half a knot is not attractive.

To cut them together on the band saw I used some drywall screws to pin both sides together. Ahgast and horror at making these unsightly holes in a piece, especially where the bevels under the screw head mar the wood further. I know, but never fear, three of the four screw heads went into areas that would be waste. The prominent one up front is where I planned to drill a hole for a peg, The other two fell into areas to be removed for the joinery of the back and tool board. The only blemish left would be along the back edge on top. Building it for someone else and I would fill it. Since this is a shop piece, I'll be happy to leave it alone.

After sawing them out, I kept the sides screwed together while I cleaned up the saw lines by rasp and by scraper.

Then I drilled through mortises for the tool board and a space for the back board was sawn out.

Then I could separate the twins.

I pinched them back together with a couple clamps, (because I forgot this part) and sawed a couple through tenons to fit through the top shelf. Joining the top shelf with a dado and wedged through tenons.
.JPG)
I cut my dado into the top shelf using a stair saw and chisels. Then I used the sides to line up where to drill and chisel all the way through.
.JPG)
.JPG)
I did a dry fit assembly and surveyed my work. The sides were good but there was something missing. I thought about Peter Follansbee's tool chest, and not only the painting on the outside, but how he had used some scraps of carving demos for the shelf rails on the inside. (You can read about that HERE) I had already built my tool chest by the time I saw what he had done and I was sorry I hadn't thought of the same thing. I decided to not let another opportunity pass me by.

I laid out a quick pattern of interconnecting circles, thanks to George Walker I've come to know this as a Guilloche pattern. It's become one of my favorite carving themes. After carving out the circles I carved out a pattern of swirls and flowers to fill the rounds.
.JPG)
Pine does not like to be carved. It is much more challenging than oak and getting a crisp line can be difficult between the winter wood and the summer wood. The carvings turned out a little rough, but over all I'm ok with that. Over all they look good together, and again, this is for my shop.
.JPG)
I got the glue up in and after letting it set up I was able to balance the tool rack on the bench top to see how things might look eventually.
Now I was down to the pegs. but we'll save those for next time.
Ratione et Passionis
Oldwolf


Very nice, I LIKE it! Congratulations on the new home and the move into a new shop.
ReplyDeleteDoug
That's a nice looking rack you have
ReplyDeleteAhh, narcissism is what separates us from the guys who build straight from plans.
ReplyDeleteThis comment has been removed by the author.
ReplyDeleteGood job Derek. Really like the use of the molding and the sector sticks.
ReplyDeleteBeen thinking of making a couple of these for my bedroom to hold books, hats, belts and what ever else.
nice job on the carving also.