
Rescue Mission Part Two
I had a pretty beaten up table and chair from a friend and client that I promised I'd have a go at putting back together. To survey the damage done you can check out THIS POST.
I decided to start the process by replacing the cleats. The originals were made from rough sawn 5/4 poplar and it just so happened I had some more of that in the shop. I decided to replace both cleats so the thickness would match between them. I didn't want to fight to get the legs even.
I cut the poplar down to the same width as the original cleats and used the original cleat to replicate the pattern for the holes.

A little time at the drill press and things were looking pretty good.

I thought about leaving the new cleats bare, but decided that putting a little stain on them to darken them like the originals was probably a good idea.

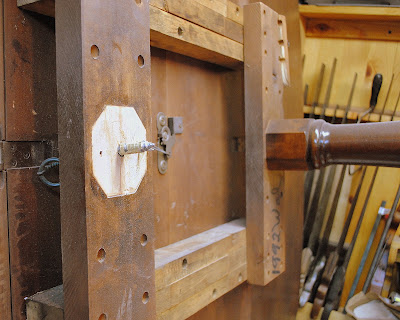
I had a little dark stain still sitting around from a past project. I squared off a section around the center because the original had been glued lightly between the leg and the cleat. End grain to side grain gluing is never a certain prospect but the originals had the bolts and a couple "anti-rotation" nails placed to help hold things together. I figured it would hurt to add some glue as well. I taped off the square so the glkue and the finish wouldn't have to play together.

One of the legs had it's mounting bolt ripped clean from it's center.
To replace it I had to plug the original hole and re-drill and replace the center. I lined up a 3/4" forstner bit and drove down as deep as the bit would go.

Some glue and a poplar dowel and the hole was good and plugged.

Once the glue was dry, I hit it with a flush saw and found the center point

Drilled a new pilot hole.

And replaced the bolt.

Repairing the other leg was a little bit more of an adventure. I'll write about that more next time
Ratione et Passionis
Oldwolf
I decided to start the process by replacing the cleats. The originals were made from rough sawn 5/4 poplar and it just so happened I had some more of that in the shop. I decided to replace both cleats so the thickness would match between them. I didn't want to fight to get the legs even.
I cut the poplar down to the same width as the original cleats and used the original cleat to replicate the pattern for the holes.

A little time at the drill press and things were looking pretty good.

I thought about leaving the new cleats bare, but decided that putting a little stain on them to darken them like the originals was probably a good idea.

I had a little dark stain still sitting around from a past project. I squared off a section around the center because the original had been glued lightly between the leg and the cleat. End grain to side grain gluing is never a certain prospect but the originals had the bolts and a couple "anti-rotation" nails placed to help hold things together. I figured it would hurt to add some glue as well. I taped off the square so the glkue and the finish wouldn't have to play together.

One of the legs had it's mounting bolt ripped clean from it's center.

To replace it I had to plug the original hole and re-drill and replace the center. I lined up a 3/4" forstner bit and drove down as deep as the bit would go.

Some glue and a poplar dowel and the hole was good and plugged.

Once the glue was dry, I hit it with a flush saw and found the center point

Drilled a new pilot hole.

And replaced the bolt.

Repairing the other leg was a little bit more of an adventure. I'll write about that more next time
Ratione et Passionis
Oldwolf


Nice!
ReplyDeleteToby