
Every project needs at least one dovetail
It was a skill I struggled with for a long time when I began woodworking, I was envious of those that could pull it off and thought about it a lot. Dovetailing!
I am sure it is not just me who felt the specter of dovetailing creeping in my consciousness, I believe that there is a good deal of woodworkers out there who feel the same. I judge these thoughts based on the amount of articles I see in magazines concerning dovetails every year, I'll bet that each brand of magazine runs a new article on dovetailing 3 times a year.
Now there are aspects of a dovetail that I have not yet conquered. First of all I hand cut all my dovetails, I have not been able to figure out the router thing when it comes to them. I don't know that I want to bother figuring out the router thing. I am not a high production machinist shop. I am a man with a hobby, and I very much enjoy cutting and fashioning joinery. The success when the pieces fit together the way you planned...almost unbeatable.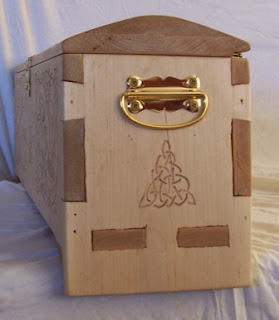
I cut through dovetails, I have done both straight and dovetails at a 5 degree angle. I will put up a couple pics of one of my renditions on the Mastermyr Chest. I am sure if this blog continues on you will hear more from me on the Mastermyr Chest, a piece I have recreated a half a dozen times and will continue to work on until I hit perfection. I may be difficult to tell from the photos but the trick to the chest it the sloping, triangular shape of the piece, the front, back, and sides of the chest all slope inwards by 5 degrees. I know I burned up several brain cells figuring out if the joinery would work, much less how to accomplish it. I built the piece for a competition, I got no response after sending in the photos, but the pieces that won were very modern looking, Nothing ventured - nothing gained, I am proud of the piece at any rate
Anyway my love for dovetails made me want to find a place to include them in my bench. The first, most obvious place was the 1x wrap that encircles the bench top. And at the point that I was making the shelf I had every intention of doing that as well, in the end I didn't and I guess as the years go by that may be one of several regrets with this version, but it will not be a big one.
I chopped one simple dovetail for each corner of the shelf. I have never dovetailed 2x material before, it was a little interesting. First I cut the 2x stock to size, Then I cut rabbits in the pieces that would make up the sides. Then I set out to cut the dovetails. Cutting the tail portion comes first, I measure this out with a ruler, a marking gauge, and an angle gauge set at 9 degrees of slope. When I am cutting 1x material for drawers and cabinet sides, I use a shop made cutting guide that gets clamped on to the piece and keeps me honest, I did not want to go through the trouble of makeing a guide that would fit 2x lumber. So I marker it out and cut them free hand. Things turned out pretty well, they were a touch sloppier that I have gotten used to. but moving on.

After I cut the first tail I matched up the end grain of one of the shelf ends and outlined the tail with a pencil. The process I follow to cut the receivers for the tails works like this. 1) I as accurately mark out where I need to cut and make those cuts with a backsaw/dovetailing saw. 2) I then walk the piece over to my drill press and select the forstner bit that will pass through the narrowest point of the receiver slot. 3) I drill a hole with the edges of that hole touching the line demarcating the maximum depth of the receiver. 4) I then go back to the work bench, and use my dovetailing saw and cut to open up the hole for access for a coping saw. 5) I inset the coping saw and cut along the depth line, finishing off the cut, first to one side and the to the other.
After testing the fit on this first joint and seeing if I need to make adjustments to any of the gauges, I used the cut dovetail to transfer the information to the other three corners. I cut all the tails. then lined up to cut the receiver slots to match each corner individually
With all the dovetails cut I assembled and cut some support cleats for in the middle. These were attached via wood glue and 4" screws. In the last picture you can see the shelf sitting upright against the basement wall with the two cut shelf boards leaning next to it.
Next time...assembly!

Good Night All
Oldwolf
I am sure it is not just me who felt the specter of dovetailing creeping in my consciousness, I believe that there is a good deal of woodworkers out there who feel the same. I judge these thoughts based on the amount of articles I see in magazines concerning dovetails every year, I'll bet that each brand of magazine runs a new article on dovetailing 3 times a year.
Now there are aspects of a dovetail that I have not yet conquered. First of all I hand cut all my dovetails, I have not been able to figure out the router thing when it comes to them. I don't know that I want to bother figuring out the router thing. I am not a high production machinist shop. I am a man with a hobby, and I very much enjoy cutting and fashioning joinery. The success when the pieces fit together the way you planned...almost unbeatable.

I cut through dovetails, I have done both straight and dovetails at a 5 degree angle. I will put up a couple pics of one of my renditions on the Mastermyr Chest. I am sure if this blog continues on you will hear more from me on the Mastermyr Chest, a piece I have recreated a half a dozen times and will continue to work on until I hit perfection. I may be difficult to tell from the photos but the trick to
 the chest it the sloping, triangular shape of the piece, the front, back, and sides of the chest all slope inwards by 5 degrees. I know I burned up several brain cells figuring out if the joinery would work, much less how to accomplish it. I built the piece for a competition, I got no response after sending in the photos, but the pieces that won were very modern looking, Nothing ventured - nothing gained, I am proud of the piece at any rate
Anyway my love for dovetails made me want to find a place to include
 them in my bench. The first, most obvious place was the 1x wrap that encircles the bench top. And at the point that I was making the shelf I had every intention of doing that as well, in the end I didn't and I guess as the years go by that may be one of several regrets with this version, but it will not be a big one.
I chopped one simple dovetail for each corner of the shelf. I have never dovetailed 2x material before, it was a little interesting. First I cut the 2x stock to size, Then I cut rabbits in the pieces that would make up the sides. Then I set out to cut the dovetails. Cutting the tail portion comes first, I measure this out with a ruler, a marking gauge, and an angle gauge set at 9 degrees of slope. When I am cutting 1x material for drawers and cabinet sides, I use a shop made cutting guide that gets clamped on to the piece and keeps me honest, I did not want to go through the trouble of makeing a guide that would fit 2x lumber. So I marker it out and cut them free hand. Things turned out pretty well, they were a touch sloppier that I have gotten used to. but moving on.


After I cut the first tail I matched up the end grain of one of the shelf ends and outlined the tail with a pencil. The process I follow to cut the receivers for the tails works like this. 1) I as accurately mark out where I need to cut and make those cuts with a backsaw/dovetailing saw. 2) I then walk the piece over to my drill press and select the forstner bit that will pass through the narrowest point of the receiver slot. 3) I drill a hole with the edges of that hole touching the line demarcating the maximum depth of the receiver. 4) I then go back to the work bench, and use my dovetailing saw and cut to open up the hole for
 access for a coping saw. 5) I inset the coping saw and cut along the depth line, finishing off the cut, first to one side and the to the other.
After testing the fit on this first joint and seeing if I need to make adjustments to any of the gauges, I used the cut dovetail to transfer the information to the other three corners. I cut all the tails. then lined up to cut the receiver slots to match each corner individually
With all the dovetails cut I assembled and cut some support cleats for in the middle. These were attached via wood glue and 4" screws. In the last
 picture you can see the shelf sitting upright against the basement wall with the two cut shelf boards leaning next to it.
Next time...assembly!

Good Night All
Oldwolf


Comments
Post a Comment