
A Special Wine Ceremony Box
Around a month ago I had a special occasion to celebrate. My youngest sister was married. It was a fun, free-spirited ceremony set in a outdoor pavilion set right near the banks of the Mississippi River. A beautiful setting and despite it falling on one of the hottest days of the year, I was more than happy to wrap up in a rented monkey suit to join the ceremony. Other than my much sought after attendance, I had one other reasonable contribution to the day. My sister had asked me to build a box for the Wine Ceremony.
Wine Ceremonies seem to be a trendy thing for couples to do in recent years, If you haven't heard here's how they work here's the basics (with plenty of variation between couples). The couple starts with a nice bottle of wine, and two letters sealed in envelopes and a wooden box. The letters are written by each, for the other and sealed unseen into envelopes. Then the letters and the wine are sealed into the box and every so often, every five year anniversary . . .every twenty-five year anniversary . . . the box gets opened, the wine is drank, the letters read, and the honeymoon is revisited.
It also can be used in case of emergency. Marriage problems begin, the box is opened, the wine consumed, the letters read, young love remembered, and the road to resolution begins.
I have built a few of these for clients and friends over the years, but this occasion called for something special. I determined instead of a carved box with a hinged lid I create something that lifted off entirely and was large enough to hold a bottle of wine, a pair of glasses, the letters, and a oversized can of beer (the groom's request).
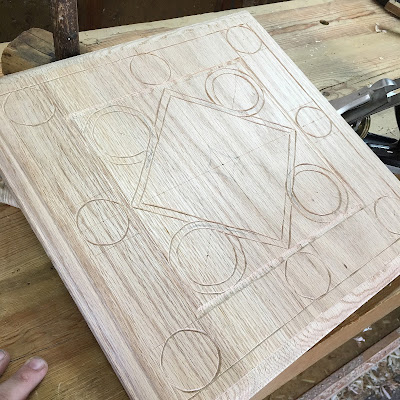
I determined my sizing, and edge glued up the lid. Cut a molding around the perimeter with a complex molding plane. After digging into my library for a while I picked out the 17th century period carvings to use as inspiration. I mixed a frame and a center from two different pieces, but on paper they worked well together. I scratched in the layout lines with dividers and awl, following with a little line work with a "V" chisel.

The next step is to lay out the rest of the carving work with strikes from various gouges.

With the gouges stamped in it's working back into the pattern, back cutting into the design with those same sweeps.

I cut dovetails for the box sides and glued them up.

Once the glue dried, I planed and trued the box. Then marked a line and ran a saw separating 1 1/4" from the sides. This rim would connect to the bottom of the lid, acting as a cleat system to help maintain the large panels flatness over time. For the connection I used glue along the long grain and two pocket hole screws per side.

I wrapped a little mitered walnut strip along the bottom because the combo of red oak with a little walnut is pretty magical and finished the piece with Tru-oil and dark paste wax.

I machined up some brass rod as registration pins located in three of the four corners (to maintain the same orientation again and again) and installed two hasps on the sides. One for the bride to padlock, and one for the groom. Here is a shot of it set up before the ceremony kicked off. It turned out quite nice.
Congratulations Ben and Majel. Here's to a satisfying life together.
Ratione et Passionis
Oldwolf


Comments
Post a Comment