Inside a Dutch Tool Chest: Saw Storage
This will be a quick series walking through my decisions in kitting out the inside of my new Dutch Tool Chest. The possible ways to do this are exponential in number and I'm not even imagining my answers will hold up for anyone else. But the thought exercise that goes into fitting a specific tool kit into a specific box seems to me worthwhile to deconstruct.
Saws are a unique storage problem, I suppose you could say the same for any hand woodworking tool, but saws are of primary importance, long and somewhat delicate construct. When deciding on tool storage issues, saws are where I usually begin.
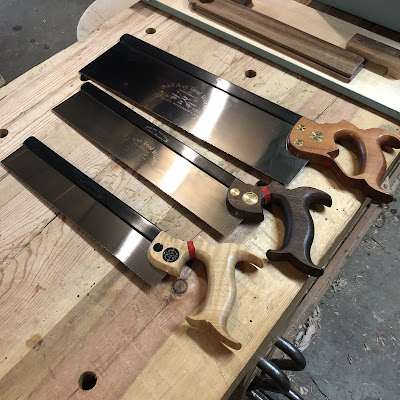
Above is the holy trinity of backsaws, Dovetail (filed rip), Carcass (filed crosscut) and Tenon (filed hybrid), and yes I want to pack in all three. I could do with less, I have done with less, but this exercise is about fitting in the kit I want to have to take to general woodworking classes and demos, and I'd like to have all three of these saws.
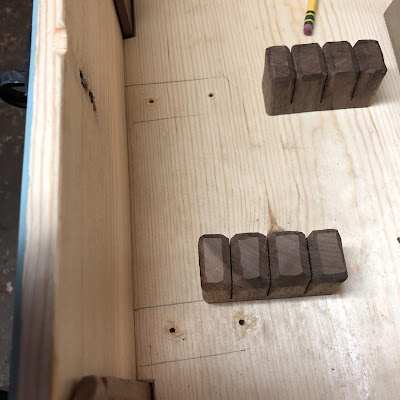
Tool box saw tills can be complex contained compartments (like in my traditional tool chest) or as simple as a block of wood with a kerf to support the saw upright. Because this chest is meant to travel I decided to go with a pair of kerfed blocks to support the saw blades at two points.
I aligned the two blocks together, measured where my kerfs needed to be and marked both blocks simultaneously so things would come out aligned straight. When measuring the spacing I crowded the handles together with the thickness of 4 sheets of printer paper between them. A tight fit but space is a premium and I didn't want to blow it with the first installation.
I set the blocks in place using the shortest saw to get the spacing I needed and making sure the handle would sit low enough to the lid would clap it coming down.
I traced a pencil line around the block placement and drilled the pilot holes for the screws to come up from underneath. Then I drove the screws up from underneath until they were just a touch proud. Then I reset the walnut block in the lines and pressed down to scribe where to drill the pilot holes in those pieces.
Then it was driving the screws up from underneath until they were flushed and clocked. Things will have to go terribly wrong for anyone to see that the screws are clocked, but if you're doing them just so people will see, you're doing it for the wrong reasons. You do it because it will redeem your celestial soul in the afterlife and allow for a better reincarnation in the next.
Speaking of powerful unnamed spirits and their affinity for dumb animals, As I installed these I had a moment of worry. I just eyeballed the original pilot screws without any concern where they'd fall in the kerfed blocks. Now I realized I could be driving a screw up directly into or worse, skimming alongside one of those kerfs and I might not know it until I tried to jamb a saw in there.
For whatever stupid reason I missed, but I will endeavor to remember the concern if I repeat this exercise in the future.
The space below is tight and driving screws in those spaces is a pain in the posterior. A stubby screwdriver can get you there but this little 1/4" ratcheting driver is one of my favorite problem solvers. You should be able to find them in amongst the automotive tools. They allow you to apply pressure into the screwhead to keep the flat head engaged while your other hand makes the ratchet turn.
The last part is the final test. Throw the saws in the kerfs and carefully close the lid. Hopefully you took plenty of planning and care and things clear fine. If it's close and you're not sure you can use another trick I figured out. I turned on the video feature on my cell phone, making sure the light was on. I set the phone in the chest with the camera angled at my precious saw handles and let the video record while I closed and opened the lid.
(I'm not gonna post the little video but if you're interested here's a link that I hope works https://photos.app.goo.gl/M6CmXJg5oA8JAysw8 )
With the saws in place the second space eating tool in the hand tool trinity would be planes. I will show you how I tacked those next.
Ratione et Passionis
Oldwolf


I've been looking at saw till designs for the Lane blanket chest I'm hacking into a makeshift ATC, as well as the Dutch chest I'm planning to build later this year -- and I like your approach here, especially with the eased edges leading into each saw's kerf.
ReplyDeleteOne thing I've often seen in backsaw tills is an even closer spacing, with two handles on the strong side and one or (rarely) two handles placed on the off-hand side. In my sketches it often amounts to a game of Jenga, with the longer plates resting next to the opposing saws' totes. Perhaps it's robbing Peter to pay Paul -- 1/2" gained in depth, in exchange for more width devoted to the saw till -- but with space at a premium, it's a problem I would love to solve.
Have you ever considered / tried this approach? Thanks very much!