
Filling the Bottom of the Chest
I know tonight should be my mortise entry into the "How I'd Do It Friday" co-op with several others in the woodworking blogging community, but unfortunately I'm having some technical difficulties with the video. Hopefully I'll get it up really soon. Instead, and perhaps to help distract me from my technological frustrations, I changed my focus tonight to write some more about my traditional tool chest build.
*****
By all rights, if I were to follow standard logic and the plan, then the next step in my build of a traditional tool chest (in an anarchistic style) would be to wrap the carcass and lid in skirts. Well here in the Oldwolf Workshop we follow the standard substandard logic and I think we lost the plan a couple months ago so I decided to change it up and attack things out of order. I filled the chest with the varrious tool holding apparati first.
Seriously there is some logic to the decision, mostly it is based on the fact that I live in Wisconsin, and that my shop is really a tin can with some nice tools inside. It's not the best shop I've ever had (I've had some nice basement shops in the past) and it's not the worst shop I've had, (long time readers will remember the Wood Shop Jr. a 5X9 closet at the bottom of some stairs). Eric Bushèe over at the Breen Bush Design Blog listed mine on the top of his "Poor Excuse for a Shop" workshop list, and he's probably right. (though I think I am in good company.)
In the end I don't believe it's the quality of the shop that matters as much as the quality of the work that comes from it. I would rather be making sawdust working out of the back of a '68 VW van than no making sawdust at all. But the reality is that winter in Wisconsin slows down my progress, and heating it as much as I can is getting pricier and pricier. This year I decided to try something different, I'm going to clear out some space in our dining room and move in my portable joinery bench so I can work in comfort and warmth this winter.
The decision to build the tool chest now came from the exercise of trying to decide what tools I should bring along. The best answer I could think of would be to bring all the basic ones I could use. Now it's November and the snow hasn't really flown here yet. but once it does I won't be able to get my van up the hill to my shop to load the chest and bring it home. So the smart money is on making the chest usable first, in case the snow flies, and finishing off the skirting after that, and that's how we come to building the apparatus to hold and store the tools.
I wanted to start by making sure I utilized the advantage of vertical height in the chest. At several points in "The Anarchist Tool Chest" Chris makes mention of the front of the tool chest as a great place to squeeze in a tool rack to hold joinery saws, chisels, or tri-squares, but he doesn't demonstrate anything. It really is a simple concept to come up with something though. At first blush you may be tempted to to just run a thin board with a couple spacers to hold it out from the chest wall.
This was my first consideration but I worried a little about storage through the centuries. If I hung a joinery saw in this configuration I decided it may put some pressure on the blade's toe as gravity pushes it against the rail and the chest wall. I decided I would run two strips, one against the chest wall and one seperated by a couple spacers.
I located the strips far enough up the wall that the handles will sit below the top edge comfortably but there is enough height to hang up to a 16" backsaw
I did have to make a switch up to the wood I was using for the insides of the chest. Originally I was going to use poplar like I did for the shell. I miscalculated my poplar purchase though and 60 bf turned out to not be enough, I had estimated 50 board foot with a 20% mark up for waste, and for a while I thought I was going to get away clean. In the end, I will end up using most of the 60 bf for the shell, bottom, lid, and skirts, with a very small amount of waste.
This works out well though because I was able to pick up some pine for the insides, and I had always planned on using hickory for the portions that need to be "long wearing."
Once the rack was in place, of course I had to set the chest down off the workbench to get a good look at how things hung in the rack.
By now the chest was getting pretty weighty and it was a bit of a struggle muscling it up and down from the workbench, but I was too excited not to give the rack a proper try.
As I looked at what I had accomplished a thought occurred to me. If this chest managed to survive intact for a century or more, would the glue and the nails be able to support the weight of these tools for all time? Sadly, I decided I probably needed to reinforce it with some support columns that ran to the bottom of the chest.

So I milled up a couple blanks of poplar to be wide enough square to support both of the long rails.

Then I attacked them with the spokeshave to bevel the edge that would be facing away from the walls. The corner braces each had one corner chamfered, the center support had two corners chamfered.

I planed away the end grain on a shooting board until they each fit in place snugly, Then I tacked them into place with some finishing nails.
With the rack done it was time to move forward into the saw till. I liked what Chris had done in TATC, but I had a few ideas I thought might improve it. First Chris's was made to hold four saws and I wanted to hold 5, A full size 24" rip and crosscut saw with larger aggressive teeth, some shorter 20" rip and crosscut saws with a finer tooth set, and eventually a larger 18" tenon saw. So first I needed up upsize the width of the till boards.

I also understand that underneath the saws is a great place to store a decent amount of those "every once in a while tools" like a hacksaw, saw files, metal punches and a taper reamer. Some of my files are a little on the long side so I decided to make an arched cut out beneath the saw kerfs to allow space for longer items if need be.
The tool rack I had just installed had to be taken into account as well. I had to move the start of the tills over a bit to make space for clearing the saw closest to the wall easily past the rack.

I ganged the two pieces of pine together with some screws and took the work to the bandsaw. To get the right cut for the kerfs I made a couple of passes to remove the waste.
I was super happy with how this turned out.

I set it on the bench and played around a bit to see how I wanted the saws to fit. I mocked it up inside the chest as well and found I could remove another 1/2" off the front side of these tills and still clear the hanging rack just fine.
I know it's only another 1/2" of space but inside this chest I'll take every little bit I can.

I chose to set the tills in place off center so the handles would all bunch up on the right side. This left enough room on the far end for my saw vise. I measured out and installed a couple cleats for the outer wall and secured it to the till boards with some more finishing nails.
I also toe-nailed in a couple nails connecting the till boards themselves to the chest wall.

The saw till was in. Again I lifted the chest down off the workbench, hopefully for the last time, and I started playing around with the spacing I had left.
Chris installed another long, shorter partition along the back wall for his moulding planes and his hollows and rounds. I am still in the market for most of those things. I decided I was pretty happy leaving the whole side open until I tried to decide how to fit my sharpening supplies into the chest.
At this point I use the Super Scary Sharp Sandpaper Sharpening System (try saying that 3 times fast) I know it will cost me more over time, but the initial buy in is very low cost compared to other methods, and that is important in our house right now. The big supply you need for this system is a reliable flat surface. Some folks use glass plates, When I was looking around I decided upon manufactured stone tiles from the home store.
They come in 12" X 12" sizes which holds 3 1/3rd sheets on a plate and they are plenty flat for my purposes. They have held up well for a couple of years now and if I break one I can go and replace it for less that 2 dollars. They are a big item to store though and I wanted to fit them in nicely.
I decided to put in a cross till with a pine board I could just life out from between it's battons if I so desire. My box for my carving chisels fit very nicely in the space as well. This will be easy to modify and remove in the future if it turns out to be a bad idea, but for right now it seems like the right move.

With that all said and done I filled the bottom of the chest as much as possible (for now) and rested the lid on it for the evening. I really am very happy with the way the inside is working out. It gives me high hopes for the upper half of the chest. Building in the sliding trays. But that will have to wait until next time we visit the chest.
Ratione et Passonis
Oldwolf
*****
By all rights, if I were to follow standard logic and the plan, then the next step in my build of a traditional tool chest (in an anarchistic style) would be to wrap the carcass and lid in skirts. Well here in the Oldwolf Workshop we follow the standard substandard logic and I think we lost the plan a couple months ago so I decided to change it up and attack things out of order. I filled the chest with the varrious tool holding apparati first.
Seriously there is some logic to the decision, mostly it is based on the fact that I live in Wisconsin, and that my shop is really a tin can with some nice tools inside. It's not the best shop I've ever had (I've had some nice basement shops in the past) and it's not the worst shop I've had, (long time readers will remember the Wood Shop Jr. a 5X9 closet at the bottom of some stairs). Eric Bushèe over at the Breen Bush Design Blog listed mine on the top of his "Poor Excuse for a Shop" workshop list, and he's probably right. (though I think I am in good company.)
In the end I don't believe it's the quality of the shop that matters as much as the quality of the work that comes from it. I would rather be making sawdust working out of the back of a '68 VW van than no making sawdust at all. But the reality is that winter in Wisconsin slows down my progress, and heating it as much as I can is getting pricier and pricier. This year I decided to try something different, I'm going to clear out some space in our dining room and move in my portable joinery bench so I can work in comfort and warmth this winter.
The decision to build the tool chest now came from the exercise of trying to decide what tools I should bring along. The best answer I could think of would be to bring all the basic ones I could use. Now it's November and the snow hasn't really flown here yet. but once it does I won't be able to get my van up the hill to my shop to load the chest and bring it home. So the smart money is on making the chest usable first, in case the snow flies, and finishing off the skirting after that, and that's how we come to building the apparatus to hold and store the tools.
 |
| The first strip placed with glue and a couple finish nails. |
I wanted to start by making sure I utilized the advantage of vertical height in the chest. At several points in "The Anarchist Tool Chest" Chris makes mention of the front of the tool chest as a great place to squeeze in a tool rack to hold joinery saws, chisels, or tri-squares, but he doesn't demonstrate anything. It really is a simple concept to come up with something though. At first blush you may be tempted to to just run a thin board with a couple spacers to hold it out from the chest wall.
This was my first consideration but I worried a little about storage through the centuries. If I hung a joinery saw in this configuration I decided it may put some pressure on the blade's toe as gravity pushes it against the rail and the chest wall. I decided I would run two strips, one against the chest wall and one seperated by a couple spacers.
 |
| Three spacers for between the strips, a little thicker than 1/4". |
 |
| A drop of hide glue on the spacing buttons. |
This works out well though because I was able to pick up some pine for the insides, and I had always planned on using hickory for the portions that need to be "long wearing."
 |
| Nailing the outer strip into place. |
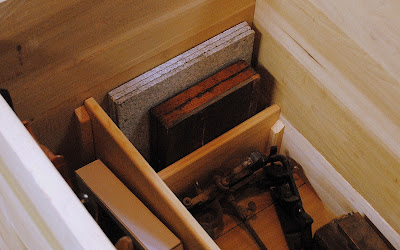
 |
| Not for sure everything that would live in there eventually, but I wanted to weight it down and fill it up to see how much I could get away with and I was surprised at how much. |
As I looked at what I had accomplished a thought occurred to me. If this chest managed to survive intact for a century or more, would the glue and the nails be able to support the weight of these tools for all time? Sadly, I decided I probably needed to reinforce it with some support columns that ran to the bottom of the chest.

So I milled up a couple blanks of poplar to be wide enough square to support both of the long rails.

Then I attacked them with the spokeshave to bevel the edge that would be facing away from the walls. The corner braces each had one corner chamfered, the center support had two corners chamfered.

I planed away the end grain on a shooting board until they each fit in place snugly, Then I tacked them into place with some finishing nails.
With the rack done it was time to move forward into the saw till. I liked what Chris had done in TATC, but I had a few ideas I thought might improve it. First Chris's was made to hold four saws and I wanted to hold 5, A full size 24" rip and crosscut saw with larger aggressive teeth, some shorter 20" rip and crosscut saws with a finer tooth set, and eventually a larger 18" tenon saw. So first I needed up upsize the width of the till boards.

I also understand that underneath the saws is a great place to store a decent amount of those "every once in a while tools" like a hacksaw, saw files, metal punches and a taper reamer. Some of my files are a little on the long side so I decided to make an arched cut out beneath the saw kerfs to allow space for longer items if need be.
The tool rack I had just installed had to be taken into account as well. I had to move the start of the tills over a bit to make space for clearing the saw closest to the wall easily past the rack.

I ganged the two pieces of pine together with some screws and took the work to the bandsaw. To get the right cut for the kerfs I made a couple of passes to remove the waste.
I was super happy with how this turned out.

I set it on the bench and played around a bit to see how I wanted the saws to fit. I mocked it up inside the chest as well and found I could remove another 1/2" off the front side of these tills and still clear the hanging rack just fine.
I know it's only another 1/2" of space but inside this chest I'll take every little bit I can.

I chose to set the tills in place off center so the handles would all bunch up on the right side. This left enough room on the far end for my saw vise. I measured out and installed a couple cleats for the outer wall and secured it to the till boards with some more finishing nails.
I also toe-nailed in a couple nails connecting the till boards themselves to the chest wall.

The saw till was in. Again I lifted the chest down off the workbench, hopefully for the last time, and I started playing around with the spacing I had left.
Chris installed another long, shorter partition along the back wall for his moulding planes and his hollows and rounds. I am still in the market for most of those things. I decided I was pretty happy leaving the whole side open until I tried to decide how to fit my sharpening supplies into the chest.
At this point I use the Super Scary Sharp Sandpaper Sharpening System (try saying that 3 times fast) I know it will cost me more over time, but the initial buy in is very low cost compared to other methods, and that is important in our house right now. The big supply you need for this system is a reliable flat surface. Some folks use glass plates, When I was looking around I decided upon manufactured stone tiles from the home store.
They come in 12" X 12" sizes which holds 3 1/3rd sheets on a plate and they are plenty flat for my purposes. They have held up well for a couple of years now and if I break one I can go and replace it for less that 2 dollars. They are a big item to store though and I wanted to fit them in nicely.

I decided to put in a cross till with a pine board I could just life out from between it's battons if I so desire. My box for my carving chisels fit very nicely in the space as well. This will be easy to modify and remove in the future if it turns out to be a bad idea, but for right now it seems like the right move.

With that all said and done I filled the bottom of the chest as much as possible (for now) and rested the lid on it for the evening. I really am very happy with the way the inside is working out. It gives me high hopes for the upper half of the chest. Building in the sliding trays. But that will have to wait until next time we visit the chest.
Ratione et Passonis
Oldwolf


Love this writeup, I'm aiming to do a similar chest pretty soon and its quite nice to see how someone else is approaching theirs.
ReplyDelete