
Getting a Leg Up Again, Fixing The Bench
One...Two...Three...Spring has arrived in Wisconsin! And the peasants rejoice. Spring and the return of reasonable temperatures means more time for me in the shop. This has been my first year with my shop located in a different place than my home, and getting to it in the winter was very difficult at times. But all that is past now and I can make it out there with regularity again, and I am thankful.
One of the first things that needed to happen was kind of a spring cleaning project, and that was fixing the leg vise on my Nicholson workbench. Back in early December I was working out in the shop and had my vise, made from construction grade pine, crack. (You can read / reminisce with me about it HERE) I knew the pine was not ever going to be a long term answer anyway, but it held up through a lot of regular use for a couple years. I had some 5/4 white oak about 11" wide and I decided to use that to rebuild.
 The first part of the process was removing the old vise. I unscrewed and removed the bench screw hardware and then I too a flush cut saw and cut the parallel guide off/ There was nothing wrong with the parallel guide I figured that I might as well reattach it to the new vise and make good use of it

 The next step was to measure out and cut the white oak board to the over all length I needed for the vise. I cut it about 2 inches longer than needed, and I'll explain more why I made that choice later. At any rate a crosscut saw and the saw benches made pretty quick work of this break down.
 I then went to work getting the roughness out of the board. This white oak was only rough sawn when I bought it and it has been tough to work with, It has been especially hard on my plane blades, causing me to sharpen the hell out of them regularly. This time I chose to attack with the belt sander instead. It still took a good amount of work.
 When I was planning for cutting the board to length I ran across this knot placed perfectly in the center of the board. I really had to plan around it or the board wouldn't be of use for long. I couldn't place the knot in the skinnier, lower leg section of the vise because I was worried it would be a weak point and result in another catastrophic crack very quickly.
 the only thing I could come up with was to center the hole for the bench screw and allow the drilling for the screw to eat up the knot.
 So here's the oak, sanded to "smooth enough for me." I used the old vise to trace the pattern onto the new vise.
 I also traced out the location of the mortise hole for the parallel guide. I grabbed the bench chisels and went to banging out the hole.
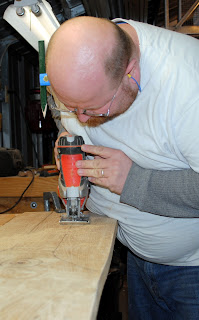
 After test fitting the parallel guide to make sure I had fit right I went to cutting out the narrower leg portion of the vise. My small bandsaw just doesn't have enough clearance to perform this so I cut out the form with a jig saw.
 I did not cut the slanted top cut at this point. After I cut the narrow portion I used the belt sander to smooth and even out the sides, making sure I maintained a smooth line and transition from the fat top to the skinny bottom, (there's a joke in there somewhere, but I'm not sure I'm the guy to tell it) Then I drilled the holes for and attached the bench screw, slid the parallel guide in place temporarily and cinched the new vise into place.
Now I still had not cut the angled top cut. This is what I was waiting for because it was important to get it right. there was no guarantee this vice would fit exactly the same as the previous one I had templated from. I wanted to make sure the vise top cut and the bench top were the same. So I put it together and then scribed the line for the right cut on the back of the vise, Then I took it apart again and took all the hardware off. Grabbed the crosscut saw again from before and made the diagonal cut following the mark I scribed.
 Now I knew this oak would hold a crisper edge than the original construction lumber had and I didn't want to cut myself with in at all. So I threw the vise board face up on some bench cookies and went around it with a cove bit, using about three passes to get to the depth I preferred

 Then I hooked everything up for good, secured the parallel guide with a single finishing nail to hold it secure and give it a pivot point. I love this picture of the new vise holding the old vise board in it's crush.
 Now since I have built the bench edge planing has been an issue with this vise. If the board is a little long I cannot clamp it tight enough to hold the board rigid in place against the weight of my handplaning. I have thought about this problem for a long while and pondered many solutions, from a sliding deadman retrofit in place to a placing a whole new wide front apron board with a variety of holes drilled for deadman, peg like support and the use of holdfasts.
As I was thinking about it I was looking at the pieces of oak I had recently cut from the narrow sections of the new leg vise. So I cleaned them up, planed them to equal width. Using an bevel gauge I set the angle of tehe end cuts to match the angle of the legs. I drilled a series of 3/4" holes all about 2 inches apart. I had to join up the two pieces because neither one was long enough to do the job on it's own.
 I then dug out the pocket hold jig and drilled some passages into the backside of the board.
 I then secured the deadman board to the bottom of the bench with some glue and the pocket screws. I stepped back and decided that it looked pretty damn nice.
 I found I like to use a holdfast to do the support most of the time as a few raps of the mallet and it adds some grip of it's own
 Well that's it for the repair and improvement, With luck the vise will last me a bit longer than 2 years this time around. If not. . . I guess it'll be back to the drawing board time.It's important that I remember to think about this bench regarding its original intentions. An experiment. Well let the experiment continue.
Cheers
Oldwolf
One of the first things that needed to happen was kind of a spring cleaning project, and that was fixing the leg vise on my Nicholson workbench. Back in early December I was working out in the shop and had my vise, made from construction grade pine, crack. (You can read / reminisce with me about it HERE) I knew the pine was not ever going to be a long term answer anyway, but it held up through a lot of regular use for a couple years. I had some 5/4 white oak about 11" wide and I decided to use that to rebuild.


Now I still had not cut the angled top cut. This is what I was waiting for because it was important to get it right. there was no guarantee this vice would fit exactly the same as the previous one I had templated from. I wanted to make sure the vise top cut and the bench top were the same. So I put it together and then scribed the line for the right cut on the back of the vise, Then I took it apart again and took all the hardware off. Grabbed the crosscut saw again from before and made the diagonal cut following the mark I scribed.


As I was thinking about it I was looking at the pieces of oak I had recently cut from the narrow sections of the new leg vise. So I cleaned them up, planed them to equal width. Using an bevel gauge I set the angle of tehe end cuts to match the angle of the legs. I drilled a series of 3/4" holes all about 2 inches apart. I had to join up the two pieces because neither one was long enough to do the job on it's own.


Cheers
Oldwolf


That holdfast ready stretcher looks so perfect under the top that I can't imagine it not being part of the original design.
ReplyDeleteThanks David. I can't believe it took me so long to come up with such a simple modification. Here's hoping it holds up to time and continues to work well.
ReplyDelete