
A Tray For Tea Part 2: Cherry Ring
Page two. . .
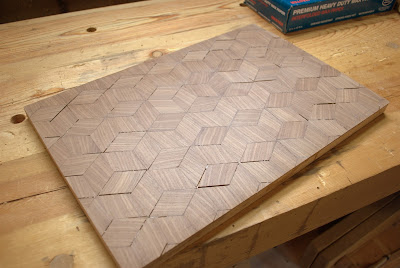
I had managed to create and smooth out a parquetry field. Let's hear it for thicker, shop cut veneer!! Of course it's not perfect. there are miscuts and voids, but it's much more successful than my last attempt.
I now had the base down for the tea tray.
The small oriental antique tea set we'd purchased for Fayth was four cups and the teapot. I wanted to do some inlay into the field and thought some contrasting rings, marking placement for the pot and cups, would be perfect. I had some cherry I'd already sliced into veneer and rings felt appropriate.

In steps the Veritas String Inlay tools. A fun little system I've hacked to do more than simple string inlay. Infact I have yet to actually do any string inlay with it. . .
It comes with a sharp blade and a compass point to which I've been using the cutter intended to slice the veneer strips, and using it to cut out circles.

With an outer diameter and an inner diameter cut through the parquetry I used a flat sweep carving chisel to remove the walnut and expose the oak underneath. The carving chisel gave me a cambered bite and worked well but there's no reason a standard bench chisel wouldn't work either.

I tried to be careful and use one setting to cut the outer radius into the field and then into the cherry veneer, then repeat the process with the inner radii, creating close matching rings.
The smaller rings are around two and a half inches in diameter which was verging on being too small to easily cut with this compass. Lee Valley offers longer replacement rods for bigger sweeps of stringing, I may consider buying another set of the short rods that come on the original and machining them even shorter by half for this smaller work.
The extra length at the back would find a way to ride on the veneer and burnish a larger ring. In this instance it didn't bother me because I had thick veneer and already had to resurface after gluing down the rings. But in the future, for finer work I may consider this.

At this point I had five rings prepper, four smaller, one larger. Now the problems to solve was the fine fitting. As I was cutting the field and the pieces I had visions of them fitting into place perfectly. I'm not certain where my error happened, or if it was the sum of a hundred little errors, but the rings were thicker than the voids. I had to slim them down to get them fitted.

I don't own a spindle sander, and I'm not sure if a commercial one would work on this small things like sanding the inside of the ring. I made my own detail sized version. I drove a nail into the center of a 7/8" dowel and clipped the head off. Then I glued and rubber banded some 150 grit sandpaper to the dowel. Then I drilled a 1" hole into a chunk of 2x4 scrap to act as a work surface and chucked everything into my drill press.
I would raise and lower the height of the table to move from inside to outside of the ring and access a fresh area on the sandpaper. It worked very well.

Hot hide glue and a veneer hammer to press the rings into place.
Now it was time to address the voids in my parquetry with mastic. Mastic is one of those crappy words that means a lot of different things depending on the context, in this context it means a mixture of fine walnut sawdust and hide glue. I spread the mastic and filled the voids with a palette knife and let everything set up overnight.
The next afternoon, I returned to again flatten the field, probably something I should have arranged to do only once, but there is no worries here. Yet another forgiving benefit of thicker, shop sawn veneer.

Then I turned my attention to the sides of the tray. More walnut, more adventure.
Ratione et Passionis
Oldwolf
I had managed to create and smooth out a parquetry field. Let's hear it for thicker, shop cut veneer!! Of course it's not perfect. there are miscuts and voids, but it's much more successful than my last attempt.
I now had the base down for the tea tray.

The small oriental antique tea set we'd purchased for Fayth was four cups and the teapot. I wanted to do some inlay into the field and thought some contrasting rings, marking placement for the pot and cups, would be perfect. I had some cherry I'd already sliced into veneer and rings felt appropriate.

In steps the Veritas String Inlay tools. A fun little system I've hacked to do more than simple string inlay. Infact I have yet to actually do any string inlay with it. . .
It comes with a sharp blade and a compass point to which I've been using the cutter intended to slice the veneer strips, and using it to cut out circles.

With an outer diameter and an inner diameter cut through the parquetry I used a flat sweep carving chisel to remove the walnut and expose the oak underneath. The carving chisel gave me a cambered bite and worked well but there's no reason a standard bench chisel wouldn't work either.

I tried to be careful and use one setting to cut the outer radius into the field and then into the cherry veneer, then repeat the process with the inner radii, creating close matching rings.
The smaller rings are around two and a half inches in diameter which was verging on being too small to easily cut with this compass. Lee Valley offers longer replacement rods for bigger sweeps of stringing, I may consider buying another set of the short rods that come on the original and machining them even shorter by half for this smaller work.
The extra length at the back would find a way to ride on the veneer and burnish a larger ring. In this instance it didn't bother me because I had thick veneer and already had to resurface after gluing down the rings. But in the future, for finer work I may consider this.

At this point I had five rings prepper, four smaller, one larger. Now the problems to solve was the fine fitting. As I was cutting the field and the pieces I had visions of them fitting into place perfectly. I'm not certain where my error happened, or if it was the sum of a hundred little errors, but the rings were thicker than the voids. I had to slim them down to get them fitted.

I don't own a spindle sander, and I'm not sure if a commercial one would work on this small things like sanding the inside of the ring. I made my own detail sized version. I drove a nail into the center of a 7/8" dowel and clipped the head off. Then I glued and rubber banded some 150 grit sandpaper to the dowel. Then I drilled a 1" hole into a chunk of 2x4 scrap to act as a work surface and chucked everything into my drill press.
I would raise and lower the height of the table to move from inside to outside of the ring and access a fresh area on the sandpaper. It worked very well.

Hot hide glue and a veneer hammer to press the rings into place.
Now it was time to address the voids in my parquetry with mastic. Mastic is one of those crappy words that means a lot of different things depending on the context, in this context it means a mixture of fine walnut sawdust and hide glue. I spread the mastic and filled the voids with a palette knife and let everything set up overnight.
The next afternoon, I returned to again flatten the field, probably something I should have arranged to do only once, but there is no worries here. Yet another forgiving benefit of thicker, shop sawn veneer.

Then I turned my attention to the sides of the tray. More walnut, more adventure.
Ratione et Passionis
Oldwolf


Comments
Post a Comment