
A "Strange" Commision. Part Two
This is a second part covering my building of a couple of fire sticks for a dear friend and excellent entertainer who goes by the name of Josh B' Gosh. He does shows for area festivals and fairs that is half sideshow, half Houdini, half comedy, and half amazement. Yes that is a lot of halfs, enough halfs for two as a matter of fact, but his show is always so well done that he can fit all those halfs into one. Trust me on this. If you want to check him out you can visit his website StrangeShows.com.
 One of the best parts of Josh's show is when he plays with fire, extinguishing the flame in his mouth and blowing huge fireballs into the air. A while back he contacted me about possibly turning some new fire sticks for him to use, he wanted to replace his thin metal ones with something a little more unique and I was more than happy to work on such a unique project. He was very gracious to give me just a few guidelines and turn me loose to see what I could come up with. This is how the product turned out.
 I have covered turning of the handles already, if you missed that and need to catch up you can read that by clicking HERE. Now I'm moving on to the part that's a little more foreign to me, the metal work to finish the pieces.
 Now it should go without saying that a pair of turned spindles is not sufficient enough to pull off the task of fire eating, at least not in a sustainable way. You need a section of metal and a wick to wrap around that metal. Josh makes his own wicks using a combination of cotton and kevlar, When he said kevlar that kind of surprised me, but I suppose it makes some sense and gives some staying power to the wick. I never would have thought that through on my own but then again I'm pretty oblivious to the inner workings of things like that, I like to sit in a magic show, suspend reality and enjoy the tricks, I'm not the guy who has to try and figure them all out.
The wicks are up to him but what I needed to do was fashion a section of metal to add to the end of the torch. The process was not unlike making a tool handle for a file or chisel.
 I went to the home store and picked up a 12" section of 1/4 square welding stock. I chose square because once inserted, it won't turn or shift around in its socket. I cut the bar into three 4 inch sections, one for practice and two for good.
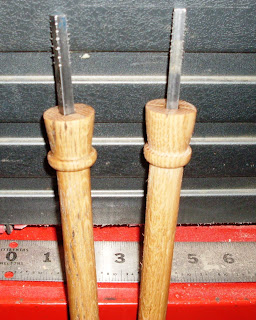
 I took the sections over and secured them, one at a time, in the machinist's vise and set to cutting barbs into them. This is where the practice section came in because I was able to play with the cold chisel to get a satisfactory result before I moved on to the "keeper" sections. Josh had sent me a link to a blacksmith who specializes in making "sideshow" gear. In looking closely at his fire eating torches it was obvious the ends had these sections of small barbs on them. This does make sense to help secure and hold the wrapped wick.
I held a cold chisel at a sharp angle and rapped on the end with a hammer. Three to four light strikes raised a nice little barb. After getting the technique down on the practice section I moved on to the real ones, trying as best as possible to space them evenly and as uniform as possible.
 Now I had to prepare the turned spindle to accept the metal tip. Not difficult as the turning process leaves a cone shaped depression centered in the end. I just chucked up a 1/4" bit in the drill press, marked 2" of depth with some painter's tape, lined up the table and drilled away.
 With the barbs cut and the holes drilled, I moved over to my smaller machinist's vise that I can secure to my regular workbench top using a couple of hold-down clamps. I moved over to this area and the second vise because the space is kind of cramped where I bolted down my large machinist's vise and now it was my turn to play with fire.
How do you fit a square peg into a round hole? You heat the sucker up first. I held a propane torch to the metal bar for around 2 minutes, then I pushed the hole I drilled in the handle down over the hot steel and the square path gets burned in. I then loosen the piece from the vise and carry the whole thing outside the shop where I have a waiting bottle of water. I poured the water over the steel to cool it down and slow down the heat eating at the walls of the socket. In the end you get a very well fitted socket that is not too tight to allow for some more manipulation. To permanently seat the metal you need to apply some epoxy.
 Now I had pretty much finished up the job, there was only one thing left for a curious boy like me to do... test drive!
I had some cotton rags in the shop so I cut a long strip and tied it around the metal tip. I did some pulling and tugging to see how well the barbs secured my version of a wick. I was actually pretty impressed with the holding power. I had no kerosene or lighter fluid in the shop. I thought about mineral spirits, but I wanted to make sure I didn't use and explosive accelerant on the wick. So, don't laugh, I soaked the rag down with "3 in 1" brand oil and took it outside, bringing with a bottle of water and my fire extinguisher.
 And I lit it. (The ten year old boy inside me giggles with joy at this picture)
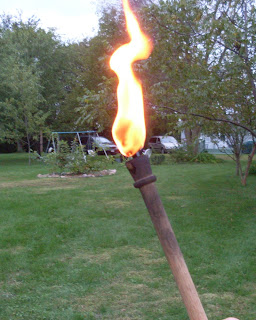 I knew this would be a very sooty flame, but I was still impressed with what I had to clean up afterward, The soot is pretty evident in these pictures, but in the light of the day I didn't notice really until I was done. I guess I was also focused on not setting anything unintentional on fire. I let the brand burn for somewhere in the vicinity of 7 - 8 minutes, just to prove to myself that the wood could hold up to the job.
 I doused the flame and cut the wick off the metal bar, cleaned up the soot with some 220 grit sandpaper and called this "Strange" project complete for now. We will see what Josh thinks of them once he has them in his hands, if I'm lucky I'll get a quick show as he takes them for a test drive, and if he wants any modifications or changes then I'm sure I can help out with that too.
 Cheers.
Oldwolf


The wicks are up to him but what I needed to do was fashion a section of metal to add to the end of the torch. The process was not unlike making a tool handle for a file or chisel.


I held a cold chisel at a sharp angle and rapped on the end with a hammer. Three to four light strikes raised a nice little barb. After getting the technique down on the practice section I moved on to the real ones, trying as best as possible to space them evenly and as uniform as possible.


How do you fit a square peg into a round hole? You heat the sucker up first. I held a propane torch to the metal bar for around 2 minutes, then I pushed the hole I drilled in the handle down over the hot steel and the square path gets burned in. I then loosen the piece from the vise and carry the whole thing outside the shop where I have a waiting bottle of water. I poured the water over the steel to cool it down and slow down the heat eating at the walls of the socket. In the end you get a very well fitted socket that is not too tight to allow for some more manipulation. To permanently seat the metal you need to apply some epoxy.

I had some cotton rags in the shop so I cut a long strip and tied it around the metal tip. I did some pulling and tugging to see how well the barbs secured my version of a wick. I was actually pretty impressed with the holding power. I had no kerosene or lighter fluid in the shop. I thought about mineral spirits, but I wanted to make sure I didn't use and explosive accelerant on the wick. So, don't laugh, I soaked the rag down with "3 in 1" brand oil and took it outside, bringing with a bottle of water and my fire extinguisher.


Oldwolf


Perhaps if you add another inch to the steel rod you can reduce some of the soot.
ReplyDeletealso... it can cut down the heat in the wood. (i guess)
ReplyDelete