
A Little Distraction
Wisconsin weather has hit my shop and hit it hard this year. Such is the adventure of having an out door shop I guess. We had freezing rain a couple weeks ago and the snow around the shops directed the water under the steel walls and across the floor, where it conveniently refroze into my own skating rink.
I guess I need to figure out a D.I.Y. Zamboni so I can take up ice skating again. . .
Instead of sawdust, I've been biding my time both writing here and prepping some work for the books I'm starting. I've also been selling some tools and making some room in the tool chest. (Thank you to any buyers out there). Still I'm having shop withdrawals.
Maybe that's why I fell victim to temptation.
My wife and I were out on the town with a few hours to kill between child related errands. We happened to be in the vicinity of a good antique store that had yielded several vintage tools to me in the past and decided to stop and browse.
"I'm not gonna buy anything" I told myself as I walked bravely past an OK Stanley 5 1/2, it was pretty grungy, needed a replacement blade, and was a little precious in price. The obligatory bin of handsaws turned up nothing I was interested in. I am pretty flush on hand saws already. Then I turned the corner and there it was again.
A Stanley Miter Saw. I knew it would be there. It's been hanging out for nearly a year. I checked the price the first time I saw it and I've walked past it a dozen time since. I thought the price was reasonable the first time, but I could never justify buying one of these marvels of engineering for myself.
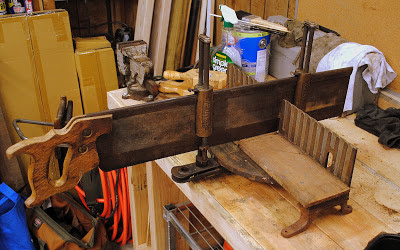
The booth had a sign that read "25% Off Everything" so I stopped and looked closer than I had before. The saw was in relatively good shape, straight and fairly clean, I could read the Goodell Pratt etch under the Henry Disston back stamp. The handle was a dog, and obviously a replacement for some reason. As far as I could tell almost all the parts were present. My wife knew what was going to happen long before I did.
Sucker me, I picked it up and brought it home.
My shop is no place to start a restoration right now so I asked my dad if he'd loan me a corner of his workbench to clean and restore it. Of course that was no problem, but this explains why my pictures appear to be coming from a different shop.


As I started looking, I realized how little I knew about these machines. I've never really used one,never seen a "good" one up close, (whatever that means), or even read a thorough description of one. I found myself a little intimidated. I started really inspecting all parts that go into one of these and I started to think "Holy crap, I may be in over my head here." but things started to make sense and I could begin to identify where things were obviously missing.
I spent a couple days trying to read up about these beasts on the internet and was really disappointed at how little good information I could find. There are several "Hey Look At What I Restored" pages, but nothing with specifics or info on parts. There are a million "Restore a Stanley Plane" pages out there, even ones that help identify the planes, but not much for these puppies. I had trouble finding anything specific to the model I bought or even much helping me track down the particular model number and make.
I did find one write up by a Brendan Dahl about his restoration of a similar miter saw. It's on a blog called Pith and it's pretty good. It helped a lot. I also managed to find a couple .pdf's of the manuals that might have come with the saws and those were something at least.
These things helped me decide how to tackle this project, but as I flash information up here I would love for any of you experts out there in Net-landia to help share your knowledge. At this point I'm calling it a 358 because it's very similar to the one on the Pith Blog, but there are differences. The places for the extension arms as a stop block for one. I've found some stamped numbers and marks, I'll post them in the near future to see if they help.If you have some knowledge, please feel free to comment below or email me. I'd appreciate it a lot.
The first step was to tear the old girl apart and get all the grime and rust scrubbed off her. And there were many, many layers of grime.

As I started taking it apart I was still amazed at all the parts. Keeping track of all of them is going to be challenging. Stay tuned to see if I get this all back together.

Then came the time for some Simple Green, some Scotchbrite Pads, a very fine grit sponge sander, some rags, and some elbow grease. I have always had very good luck with this combination for cleaning old tools.

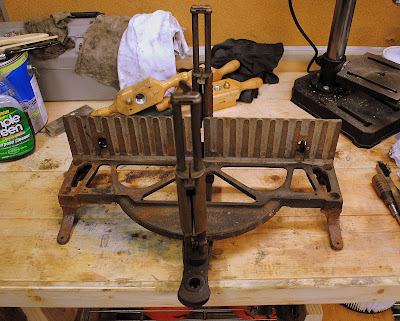
I started work on the base since it was the biggest part.


I was pleased when my efforts revealed a nice shiny degree gauge on the front. I didn't even know it was there until it started to clean up. I have to figure out the numbers on top, I'm thinking they relate to rise and run measurements, I could be wrong, (maybe you guys can tell me about that too) but I was happy to see the degree measurements I'm used to thinking in there as well.

It took a couple hours to scrub up the base. All the time I had for the day. So I oiled it down for the night to disperse any remaining water and keep it from rusting over night. Tomorrow I'll rub it down with some denatured alcohol and start to apply some new coats of paint. I'll have to look and see if I can find some light grey enamel that matches the current paint on the back wall, but it's back to black for the rest of it.
Ratione et Passionis
Oldwolf
I guess I need to figure out a D.I.Y. Zamboni so I can take up ice skating again. . .
Instead of sawdust, I've been biding my time both writing here and prepping some work for the books I'm starting. I've also been selling some tools and making some room in the tool chest. (Thank you to any buyers out there). Still I'm having shop withdrawals.
Maybe that's why I fell victim to temptation.
My wife and I were out on the town with a few hours to kill between child related errands. We happened to be in the vicinity of a good antique store that had yielded several vintage tools to me in the past and decided to stop and browse.
"I'm not gonna buy anything" I told myself as I walked bravely past an OK Stanley 5 1/2, it was pretty grungy, needed a replacement blade, and was a little precious in price. The obligatory bin of handsaws turned up nothing I was interested in. I am pretty flush on hand saws already. Then I turned the corner and there it was again.

A Stanley Miter Saw. I knew it would be there. It's been hanging out for nearly a year. I checked the price the first time I saw it and I've walked past it a dozen time since. I thought the price was reasonable the first time, but I could never justify buying one of these marvels of engineering for myself.
The booth had a sign that read "25% Off Everything" so I stopped and looked closer than I had before. The saw was in relatively good shape, straight and fairly clean, I could read the Goodell Pratt etch under the Henry Disston back stamp. The handle was a dog, and obviously a replacement for some reason. As far as I could tell almost all the parts were present. My wife knew what was going to happen long before I did.
Sucker me, I picked it up and brought it home.
My shop is no place to start a restoration right now so I asked my dad if he'd loan me a corner of his workbench to clean and restore it. Of course that was no problem, but this explains why my pictures appear to be coming from a different shop.


As I started looking, I realized how little I knew about these machines. I've never really used one,never seen a "good" one up close, (whatever that means), or even read a thorough description of one. I found myself a little intimidated. I started really inspecting all parts that go into one of these and I started to think "Holy crap, I may be in over my head here." but things started to make sense and I could begin to identify where things were obviously missing.
I spent a couple days trying to read up about these beasts on the internet and was really disappointed at how little good information I could find. There are several "Hey Look At What I Restored" pages, but nothing with specifics or info on parts. There are a million "Restore a Stanley Plane" pages out there, even ones that help identify the planes, but not much for these puppies. I had trouble finding anything specific to the model I bought or even much helping me track down the particular model number and make.
I did find one write up by a Brendan Dahl about his restoration of a similar miter saw. It's on a blog called Pith and it's pretty good. It helped a lot. I also managed to find a couple .pdf's of the manuals that might have come with the saws and those were something at least.

These things helped me decide how to tackle this project, but as I flash information up here I would love for any of you experts out there in Net-landia to help share your knowledge. At this point I'm calling it a 358 because it's very similar to the one on the Pith Blog, but there are differences. The places for the extension arms as a stop block for one. I've found some stamped numbers and marks, I'll post them in the near future to see if they help.If you have some knowledge, please feel free to comment below or email me. I'd appreciate it a lot.
The first step was to tear the old girl apart and get all the grime and rust scrubbed off her. And there were many, many layers of grime.

As I started taking it apart I was still amazed at all the parts. Keeping track of all of them is going to be challenging. Stay tuned to see if I get this all back together.

Then came the time for some Simple Green, some Scotchbrite Pads, a very fine grit sponge sander, some rags, and some elbow grease. I have always had very good luck with this combination for cleaning old tools.

I started work on the base since it was the biggest part.


I was pleased when my efforts revealed a nice shiny degree gauge on the front. I didn't even know it was there until it started to clean up. I have to figure out the numbers on top, I'm thinking they relate to rise and run measurements, I could be wrong, (maybe you guys can tell me about that too) but I was happy to see the degree measurements I'm used to thinking in there as well.

It took a couple hours to scrub up the base. All the time I had for the day. So I oiled it down for the night to disperse any remaining water and keep it from rusting over night. Tomorrow I'll rub it down with some denatured alcohol and start to apply some new coats of paint. I'll have to look and see if I can find some light grey enamel that matches the current paint on the back wall, but it's back to black for the rest of it.
Ratione et Passionis
Oldwolf


Nice box and cleaning up well. I think the numbers on top are a coopers' or framers' reference to the number of sides to a box or frame mitered together with that half angle. That is the number 6 should correspond to 30 degrees and there is probably a positive stop at that spot. Be well, I hope you thaw out soon.
ReplyDeleteHey Derek,
ReplyDeleteI've spent a bit of time with various Stanley boxes and have a 50 1/2 that is configured similar to yours. I believe the numbers on the top of the scale give you the number of sides created at that stop. 45 degree angle makes a four sided frame, hence the 4.
Hope all is well and Spring will be here before you know it. (But not soon enough)
Doug
Hello Al
ReplyDeleteYou beat me to it
Doug
Hey guys.
ReplyDeleteThanks for the info. I can't help but love the simplicity of saying "I want this to have 12 sides" and instead of figuring the degree of cut that should be, just having a number that corresponds on the saw box itself.
I suppose there's little call for that today where you just throw the calculations into your C&C machine and it kicks out the perfectly milled parts for you.
D