
Dutch Tool Chest: All The Fixings
Building the carcass of a Dutch Tool Chest in a days time isn't that overwhelming of a prospect. I feel like any experienced woodworker should be able to pull It off. It's deciding how to trick out the tool storage inside that takes the most creativity and time. Lucky for me I waited around a while after Chris introduced this project and was able to look at what other woodworkers in the online communities had done and steal borrow their ideas!
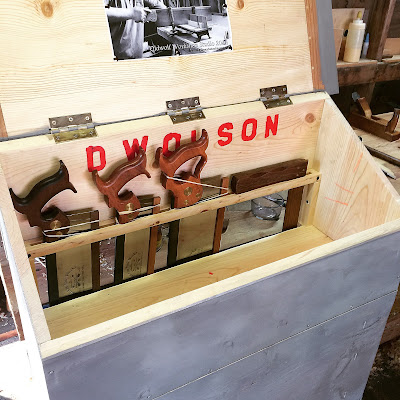
Then in front of the saws I ran a strip of walnut with 1/2" holes spaced every 1 1/4" on center. This strip holds dividers, screwdrivers, awls, and nail sets.

Many people use the Tite Mark style marking gauges, but I have to admit I'm very happy using wooden beam gauges. The drawback is the wooden gauges are bulkier to store. This required constructing a specific storage rack just for them.

One of the big decisions I made related to plane storage. The bottom of my traditional tool chest is full of my metal bodied vintage Stanley planes (#3 - #7) and my wooden body planes have always had to live unprotected on open shelves. I'm plane polygamous and switch back and forth between Woodies and Baileys depending on the situation and my mood. Since I was making another tool chest meant I could protect my woodies from dust and rust a bit better.

Once I was done I had some pics of the drawer up on social media and after fielding a handful of questions about what and where I stored inside the chest. I decided the best course of action was to shoot a quick tour of the chest.
The traveling Dutch Tool Chest is done. On to bigger and better things.
One of the things I didn't like about Chris's chest was the joinery saw storage on the floor of the upper cavity. Looking around I found a solution used by Marilyn over at She Works Wood. She opened a recess in the back of the shelf which allowed her saws to hang and pass their length through to unused space in the case below.
I popped one of the back boards off and modified the floor of the upper case, sawing an inch off the back. Then ran two strips of wood with a spacer in between supported to the floor on either end. I already like using this style of saw storage, it's how my joinery saws store in my traditional chest.

Then in front of the saws I ran a strip of walnut with 1/2" holes spaced every 1 1/4" on center. This strip holds dividers, screwdrivers, awls, and nail sets.

Many people use the Tite Mark style marking gauges, but I have to admit I'm very happy using wooden beam gauges. The drawback is the wooden gauges are bulkier to store. This required constructing a specific storage rack just for them.

One of the big decisions I made related to plane storage. The bottom of my traditional tool chest is full of my metal bodied vintage Stanley planes (#3 - #7) and my wooden body planes have always had to live unprotected on open shelves. I'm plane polygamous and switch back and forth between Woodies and Baileys depending on the situation and my mood. Since I was making another tool chest meant I could protect my woodies from dust and rust a bit better.
I used some small brass plated nails to tack down some 1/4" square walnut strips around the woodies footprints. This keeps the planes from sliding around when the chest is in transport, and keeps me honest and consistent in storing them. Plus with the strips simply tacked down, if I need to trade to my metal bodied planes I can pry them up and change them.

I upsized the dimensions of the chest a bit when I built it. I needed to fit my long wooden joiner plane. This meant there was a lot more space in the lower cavity than needed. I toyed with simply inserting another shelf to break it up and add storage, but the more I thought about it. The more I wanted to make a drawer that would hold, and protect, my joinery planes in transport. That meant a side hung drawer.

On a 1x12" off cut I laid out the size of the drawer and the spaces set aside for my plow plane, router plane, and rabbit plane. This also left some room upfront to store some other items.
When it came down to a drawer front, I had to show off a bit. I love the idea of opening this plain painted chest exterior and finding something special beneath. I sized a section of drawer front out of oak and started a quick morning of carving

I used a pattern from a 17th century box found in the Chipstone Collection. I've carved this pattern before and I'm really enamored with it.

With the carving done it was time to cut the joinery. Dovetails "blind of one eye" and dado in dividers for the joinery planes. The drawer is side hanging and I cut the slots in the sides before glue up as well.

Everything turned out with a tight fit and with a little packing shouldn't move around at all in transit. It was also pretty amazing how much else I was able to fit in the front compartment.

I added some runners inside the router planes compartment before I glued it together. I think I could eventually add a small till or lift out tray and it was easier to add this support before glue up over stabbing it in a tight space later.

I think another coat of paint over the outside is needed. I used the grey because when I was done with the carcass it was something I had on hand. It's ok, but I think I might have to go with black. Yup, gonna go black.

I used a pattern from a 17th century box found in the Chipstone Collection. I've carved this pattern before and I'm really enamored with it.
With the carving done it was time to cut the joinery. Dovetails "blind of one eye" and dado in dividers for the joinery planes. The drawer is side hanging and I cut the slots in the sides before glue up as well.

Everything turned out with a tight fit and with a little packing shouldn't move around at all in transit. It was also pretty amazing how much else I was able to fit in the front compartment.

I added some runners inside the router planes compartment before I glued it together. I think I could eventually add a small till or lift out tray and it was easier to add this support before glue up over stabbing it in a tight space later.

I think another coat of paint over the outside is needed. I used the grey because when I was done with the carcass it was something I had on hand. It's ok, but I think I might have to go with black. Yup, gonna go black.

Once I was done I had some pics of the drawer up on social media and after fielding a handful of questions about what and where I stored inside the chest. I decided the best course of action was to shoot a quick tour of the chest.
The traveling Dutch Tool Chest is done. On to bigger and better things.
Ratione et Passionis
Oldwolf
Nice job. I love the saw storage idea you invented (borrowed).
ReplyDeleteShame you didn't do your name in letters with a bit more style. Perhaps something kinda gothic like the carving.
Keep up the great blog!
Stan
Holy moly, that drawer panel is stunning. Really great stuff, Derek. Amazing how many tools can fit in there.
ReplyDeleteMatt
THAT IS wonderful!! I love the carved drawer front revealed after you remove the front panel. it's a surprise and delight.
ReplyDeletePlease take the time to see the video, folks!!!
I heard a thunderous announcement of the word "POTENTIAL" gushing from the pits of my stomach up through my pie-hole when you opened that up...
You're an inspiration, i love your blog and get updates posted through the unpluggedshop aggregator.
Keep up the good work my amigo
adam of oakland, ca