
Plane Storage Shelf: Shelves In - Back On
Last time we discussed the Plane Storage Shelf I had just finished gluing and assembling the outer carcass. Now we finish off the main part of the build. If you're new to the discussion or need a refresher on where we're been all the related posts have been gathered together HERE.
 With the dovetails glued up and dried I stood up the carcass to check it one more time for square. I also took the final measurement for the board length to cut for the shelves. A few minutes with a crosscut saw and I could call that done.
 The stopped dadoes in the carcass required a notch to be cut in the end of the boards that would face out.
 Then I contoured the facing edge into a bullnose profile with a spokeshave, a contoured scraper, and a touch of hand sanding.
 Then I went about fitting each shelf into the tight dadoes.
 The dadoes turned out slightly narrower than the stock so I took a block plane and gave the bottom edge of each shelf a bevel. narrowing the endgrain to achieve a good fit. It is better to have a narrow dado you can tune a fit to with a couple swipes of a block plane than trying to fix a dado that is too loose to start with.
 It is important to keep track of which shelf you fit to which set of dadoes. I use my own brand of marks when I do this.
 The shelves all fitted, I secured them all in place with a dab of hide glue in the back of the dado and a finishing nail placed through the side of the carcass and into the shelf towards the front.
 I needed a cleat to hang the shelf from. I used a similar idea on the top of the saw till. The difference I was able to create on the shelf was I had picked up a nice little moulding plane that gave me a great excuse to add a little detail to the cleat.

 To make the back I re-sawed some pine down to 3/8" thick and gave it a quick smooth with a finely set jack plane. I chose to fix the boards in place edge to edge. This was a solution I had to use because I was running tight on stock when I was building the saw till. Since this was an accompanying piece I decided to repeat the decision.
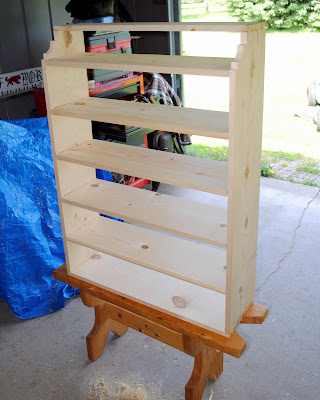
 Everything together, now I had a chance to stand it up and get a good look at it.
 And even give it a test to see how everything fit.
 A little sanding and a finish applied and the Plane Storage Shelf is ready to hang. The finished pictures with it hung and filled coming next time, I am very happy with the decisions I made on this piece because it does work out to be a prefect companion piece to the saw till. Exactly what I wanted.
Cheers
Oldwolf


I pre-drilled and counter sunk the holes for the future screws to hang the shelf with. A little glue and a couple pocket screws to secure it in place.


Cheers
Oldwolf


I need to build one of those as well, my bench has filled up with a bunch of planes after I went on a buying spree.
ReplyDeleteTime to go get some white pine I think.
Great job on yours.
It worked out very nicely! I like the idea of shelves for planes, rather than a cubby system, especially if you're not absolutely sure you'll never buy more (and who is?). Just like a saw till, you have more flexibility this way.
ReplyDeleteWhen I first started the decision process for this piece just this simple shelf felt like kind of a cop out. I'm not sure why it felt like that except it wasn't as flashy as other devices I see out there and like. But I kept coming back to what I like about Chris Schwarz's arts and crafts tool cabinet and how it is simply shelves and drawers and so the design evolved into a simple shelf.
ReplyDeleteHanging on the wall next to the saw till it doesn't feel like a cop out, it feels like I made the better decision, and that feels pretty good.
Oldwolf
Very nice Derek. And very useful. I can definitely see something like this in my future. I've got woodies scattered all over the shop and I think they deserve a nice home. Thanks for the inspiration! And thanks for keeping such a good blog.
ReplyDeleteJamie